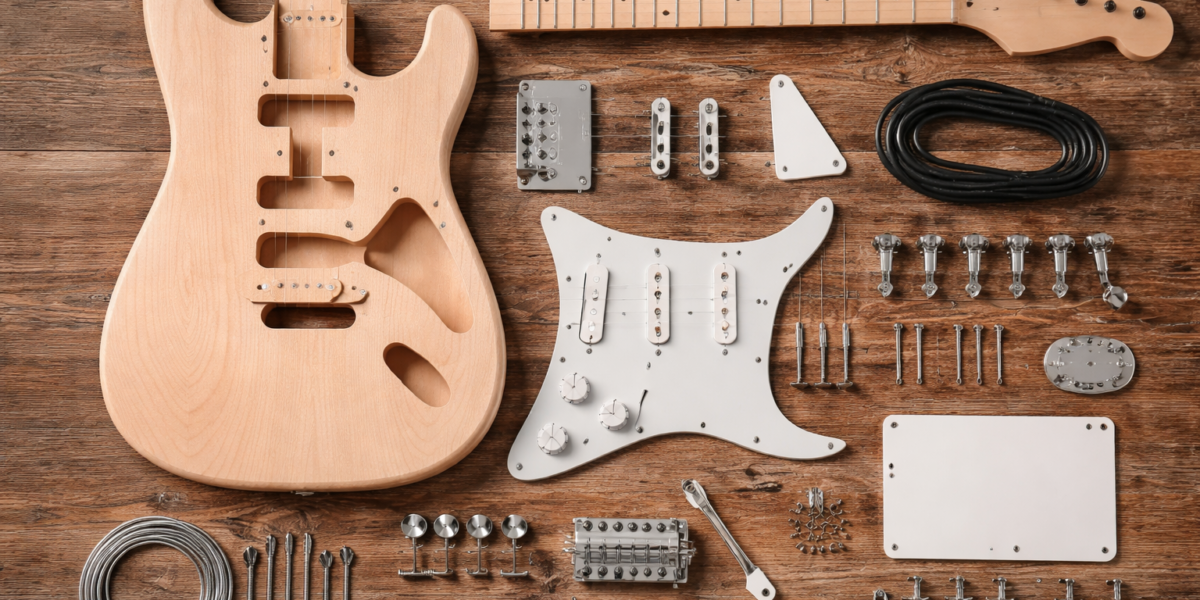
A first guitar kit build is way easier when you stop treating it like one giant project.
This 7-day plan breaks the process into clear chunks so you can avoid rushed mistakes and actually end up with a guitar that plays well.
Note: “7 days” means structured phases. If your finish needs longer cure time, extend the schedule. Don’t rush curing.
Day 1: Unbox, Inspect, and Inventory
Goals
- Confirm all parts are present
- Spot obvious defects before work starts
- Organize hardware
Checklist
- [ ] Body, neck, bridge, tuners, electronics, screws present
- [ ] Neck pocket fit visually acceptable
- [ ] No major cracks/warping
- [ ] Fretboard/fret ends inspected
- [ ] Scale length and bridge placement docs available
Pro tip
Take photos of every part before starting. Helps with warranty issues and reassembly reference.
Day 2: Dry Fit and Alignment (Most Important Day)
Goals
- Verify neck alignment
- Confirm bridge centerline and string path
- Test hardware fit before finish
Checklist
- [ ] Neck seated in pocket
- [ ] Two E-strings mock-fitted to check alignment
- [ ] Strings run evenly along fretboard edges
- [ ] Bridge position validated for scale/intonation travel
- [ ] Pilot hole locations marked (if needed)
If this day is wrong, everything after it gets harder.
Day 3: Surface Prep and Sanding
Goals
- Prepare body/neck for finish
- Remove machining marks
- Keep edges clean and intentional
Checklist
- [ ] Sand progression complete (example 120 → 180 → 220/320)
- [ ] No deep scratches left
- [ ] Dust fully removed
- [ ] Areas masked for clean finishing boundaries
Pro tip
Don’t over-sand edges into weird shapes unless that’s intentional.
Day 4: Finish Application (Coat Phase)
Goals
- Apply stain/oil/poly/lacquer cleanly
- Keep coats thin and even
Checklist
- [ ] Thin coat applied evenly
- [ ] Runs/drips checked immediately
- [ ] Proper dry time observed between coats
- [ ] Dust-free curing area used
If finishing neck separately, keep fretboard and nut area controlled and clean.
Day 5: Cure + Electronics Prep
Goals
- Let finish cure (seriously)
- Prep wiring harness while waiting
Checklist
- [ ] Finish cure progressing (no tackiness)
- [ ] Soldering tools ready
- [ ] Wiring diagram printed
- [ ] Pots/switch/jack pre-wired if possible
- [ ] Continuity checked with multimeter
This is a good day to avoid impatience damage.
Day 6: Final Assembly
Goals
- Install hardware cleanly
- Avoid stripped screws and bad geometry
- Complete wiring and function test
Checklist
- [ ] Tuners installed and aligned
- [ ] Bridge/saddles installed
- [ ] Nut installed/checked
- [ ] Electronics mounted + tested before closing cavities
- [ ] Output jack tested for stable signal
- [ ] No loose hardware/rattles
Use pilot holes and wax screws lightly if wood feels tight.
Day 7: Setup and Play Test
Goals
- Make it actually playable
- Dial in stability and intonation
Setup Order
- Tune to pitch
- Set relief
- Set action
- Check nut slots
- Set pickup height
- Intonate
- Stretch strings and retune
Play Test Checklist
- [ ] Open chords ring clean
- [ ] Barre chords are in tune
- [ ] Bends don’t choke
- [ ] Tuning stable after bends
- [ ] No major dead spots or buzz zones
Common First-Build Time Traps
- Rushing finish cure time
- Skipping dry fit/alignment checks
- Doing setup out of order
- Overtightening screws
- Trying to solve setup problems by buying new pickups
Most issues are setup/alignment, not electronics.
Optional Week 2 (Refinement Pass)
After a few days of playing:
- Recheck relief and action (neck settles)
- Fine-tune pickup heights
- Re-intonate
- Decide if upgrades are actually needed
Don’t upgrade parts until the baseline build is fully dialed.
Final Take
A first kit build succeeds when you prioritize:
- alignment
- patience
- setup
Not speed.
Follow the 7-day structure, and you’ll finish with more than a guitar—you’ll have real luthiery confidence.